Jeff Geerling’s Raspberry Pi internet monitor is a great great little project I make use of all the time. His blog post Monitor your Internet with a Raspberry Pi details what he did in great detail but I have put it here as i did have one problem getting it to work on a Raspberry Pi 5. Read on to work through the installation with the solution below.
For the purposes of this project Jeff makes use of a Raspberry Pi 4 but there is little difference in cost between a Pi 4 and the Pi 5 that has since become available so I have done this on a Pi 5. This also brings with it the other benefits of the Pi 5 such as the ability to add an NVMe HAT which I couldn’t recommend enough.
Jeff’s instructions are simple and straightforward with two minor issues to overcome on a Raspberry Pi 5 running bookworm.
When trying to run
pip3 install ansibleI got the following error
error: externally-managed-environment

× This environment is externally managed
╰─> To install Python packages system-wide, try apt install
    python3-xyz, where xyz is the package you are trying to
    install.

    If you wish to install a non-Debian-packaged Python package,
    create a virtual environment using python3 -m venv path/to/venv.
    Then use path/to/venv/bin/python and path/to/venv/bin/pip. Make
    sure you have python3-full installed.

    If you wish to install a non-Debian packaged Python application,
    it may be easiest to use pipx install xyz, which will manage a
    virtual environment for you. Make sure you have pipx installed.

    See /usr/share/doc/python3.11/README.venv for more information.

note: If you believe this is a mistake, please contact your Python installation or OS distribution provider. You can override this, at the risk of breaking your Python installation or OS, by passing --break-system-packages.
hint: See PEP 668 for the detailed specification.
See Jeffs other article to resolve this How to solve “error: externally-managed-environment” when installing via pip3 which basically involves removing the EXTERNALLY-MANAGED file in your system Python installation. Thanks again Jeff!
sudo rm -rf /usr/lib/python3.11/EXTERNALLY-MANAGEDHaving done this everything proceeded but failed again at the very last step with:
TASK [Ensure internet-monitoring environment is running.] **********************
fatal: [127.0.0.1]: FAILED! => {"changed": false, "cmd": "/usr/bin/docker --host unix:///var/run/docker.sock version --format '{{ json . }}'", "msg": "permission denied while trying to connect to the Docker daemon socket at unix:///var/run/docker.sock: Get \"http://%2Fvar%2Frun%2Fdocker.sock/v1.45/version\": dial unix /var/run/docker.sock: connect: permission denied", "rc": 1, "stderr": "permission denied while trying to connect to the Docker daemon socket at unix:///var/run/docker.sock: Get \"http://%2Fvar%2Frun%2Fdocker.sock/v1.45/version\": dial unix /var/run/docker.sock: connect: permission denied\n", "stderr_lines": ["permission denied while trying to connect to the Docker daemon socket at unix:///var/run/docker.sock: Get \"http://%2Fvar%2Frun%2Fdocker.sock/v1.45/version\": dial unix /var/run/docker.sock: connect: permission denied"], "stdout": "{\"Client\":{\"Platform\":{\"Name\":\"Docker Engine - Community\"},\"Version\":\"26.0.0\",\"ApiVersion\":\"1.45\",\"DefaultAPIVersion\":\"1.45\",\"GitCommit\":\"2ae903e\",\"GoVersion\":\"go1.21.8\",\"Os\":\"linux\",\"Arch\":\"arm64\",\"BuildTime\":\"Wed Mar 20 15:18:02 2024\",\"Context\":\"default\"},\"Server\":null}\n", "stdout_lines": ["{\"Client\":{\"Platform\":{\"Name\":\"Docker Engine - Community\"},\"Version\":\"26.0.0\",\"ApiVersion\":\"1.45\",\"DefaultAPIVersion\":\"1.45\",\"GitCommit\":\"2ae903e\",\"GoVersion\":\"go1.21.8\",\"Os\":\"linux\",\"Arch\":\"arm64\",\"BuildTime\":\"Wed Mar 20 15:18:02 2024\",\"Context\":\"default\"},\"Server\":null}"]}
A quick search around the internet brought me to 6 Ways to fix – Got permission denied while trying to connect to the Docker daemon socket? and the simple solution of:
sudo chmod 666 /var/run/docker.sock
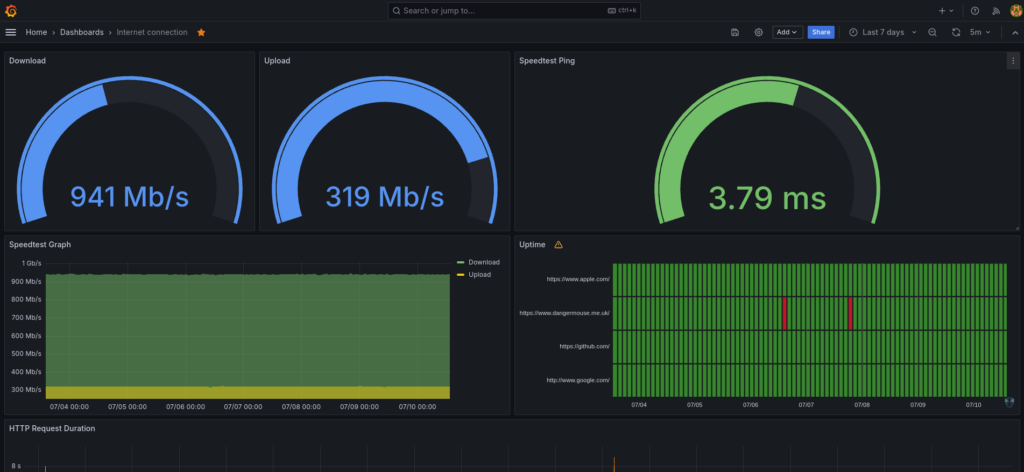
sudo systemctl restart dockerAfter that everything should start up and enable you to access the Grafana dashboard and configure pihole as your DNS server on your home network
I added this webserver to my config.yml to add it to the monitoring_ping_hosts section. After changing config. yml remember to update it from the directory it re-run the main playbook from the directory it is in
cd ~/internet-pi
ansible-playbook main.yml